> ## Documentation Index
> Fetch the complete documentation index at: https://aibco.mintlify.site/llms.txt
> Use this file to discover all available pages before exploring further.

# Embed the AIBCO Widget on Your Website

> Copy your snippet from General settings and paste it into your website. Instructions for plain HTML, Squarespace, Shopify, Wix, and WordPress.

To make the AIBCO widget available to your visitors, add a single JavaScript snippet to your website. Once installed, the widget launcher appears on every authorized page and loads the mode you selected in your dashboard.

## Get your embed snippet

<Steps>
  <Step title="Open General settings">
    Sign in at [aibco.ai/dashboard](https://aibco.ai/dashboard) and go to **General**.
  </Step>

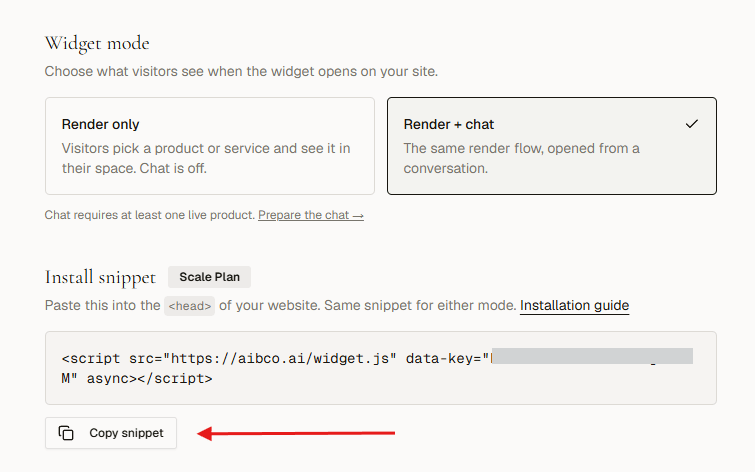
  <Step title="Copy the snippet">
    Scroll to the **Install snippet** section and click **Copy snippet**.
    <img src="https://mintcdn.com/aibco/hU0y_RLxypigHfOr/images/Screenshot-2026-08-29-130217.png?fit=max&auto=format&n=hU0y_RLxypigHfOr&q=85&s=efc17020a28c4a0a9f90f653a14eeab5" alt="Screenshot 2026 08 29 130217" width="755" height="472" data-path="images/Screenshot-2026-08-29-130217.png" />
  </Step>
</Steps>

Your snippet looks like this:

```html theme={null}
<script src="https://aibco.ai/widget.js" data-key="YOUR_KEY" async></script>
```

<Note>
  The same snippet works for both widget modes (Render Only and Render + Chat). You control the mode from the dashboard, so you never need to update your website code when you switch.
</Note>

## Where to paste the snippet

You have two placement options. Both work; pick based on what you care about more.

* **In the `<head>` tag (recommended).** The widget script starts downloading as soon as the browser parses the page head, so the launcher appears at the earliest possible moment. Use this unless you have a specific reason not to.
* **Before the closing `</body>` tag.** The browser renders your page content first and only then fetches the widget. Use this if your page performance is very sensitive to third-party scripts, or if a strict content-security or performance budget on your site prefers deferred scripts.

The snippet already includes `async`, so it will never block your page from rendering regardless of where you paste it. The only real difference is how soon the launcher becomes visible.

## Platform instructions

### Plain HTML (any site you edit directly)

Use this when you write HTML yourself or your platform is not listed below: a static site, a hand-coded landing page, a Next.js/Astro/Hugo/Jekyll project, or a CMS that gives you access to the raw HTML template.

<Steps>
  <Step title="Open your site template">
    Open the HTML file (or template partial) that renders on every page you want the widget to appear on. In most projects this is a shared layout such as `index.html`, `layout.html`, `base.html`, `_document.tsx`, or a header include.
  </Step>

  <Step title="Paste the snippet in the head (recommended)">
    Paste your snippet just before the closing `</head>` tag:

    ```html theme={null}
    <!DOCTYPE html>
    <html>
      <head>
        <meta charset="UTF-8" />
        <title>Your Site</title>
        <!-- other meta tags, styles, and scripts -->

        <script src="https://aibco.ai/widget.js" data-key="YOUR_KEY" async></script>
      </head>
      <body>
        <!-- your page content -->
      </body>
    </html>
    ```
  </Step>

  <Step title="Or paste before the closing body tag">
    If you would rather keep third-party scripts at the end of the document, paste it just before `</body>` instead:

    ```html theme={null}
    <body>
      <!-- your page content -->

      <script src="https://aibco.ai/widget.js" data-key="YOUR_KEY" async></script>
    </body>
    ```
  </Step>

  <Step title="Deploy your change">
    Save the file and deploy the site as you normally would. Reload the page on your authorized domain and the launcher should appear.
  </Step>
</Steps>

<Tip>
  Only add the snippet **once** per page. Pasting it in both `<head>` and `<body>` will load the widget twice.
</Tip>

### Squarespace

<Steps>
  <Step title="Open Code Injection">
    Log into Squarespace. Press `/` (or click the search bar) and search for **Code Injection**, then click it in the results.

    <img src="https://mintcdn.com/aibco/hU0y_RLxypigHfOr/images/image4.jpg?fit=max&auto=format&n=hU0y_RLxypigHfOr&q=85&s=6a94bee4eb67ffbb0bfb5d46ab697f6c" alt="Image4" width="1276" height="520" data-path="images/image4.jpg" />
  </Step>

  <Step title="Paste in Header">
    Paste your AIBCO snippet into the **Header** field.

    <img src="https://mintcdn.com/aibco/hU0y_RLxypigHfOr/images/Screenshot-2026-08-29-131050.png?fit=max&auto=format&n=hU0y_RLxypigHfOr&q=85&s=b99718fa8861b90e8cc2697107907e88" alt="Screenshot 2026 08 29 131050" width="1245" height="530" data-path="images/Screenshot-2026-08-29-131050.png" />
  </Step>

  <Step title="Save">
    Click **Save**.
  </Step>
</Steps>

### Shopify

<Steps>
  <Step title="Edit your theme code">
    In Shopify Admin, go to **Online Store**. Next to your active theme, click **···** → **Edit code**.

    <img src="https://mintcdn.com/aibco/bHh4nRd8PVz4miD_/images/Screenshot-2026-08-29-131319.png?fit=max&auto=format&n=bHh4nRd8PVz4miD_&q=85&s=b698f2a9c2c48f5b81ee42fb7e659252" alt="Screenshot 2026 08 29 131319" width="1106" height="524" data-path="images/Screenshot-2026-08-29-131319.png" />
  </Step>

  <Step title="Open theme.liquid">
    Under **Layout**, click `theme.liquid`. 

    <img src="https://mintcdn.com/aibco/bHh4nRd8PVz4miD_/images/Screenshot-2026-08-29-131415.png?fit=max&auto=format&n=bHh4nRd8PVz4miD_&q=85&s=cfff005b1e8e3df9e3cd15bf9eff8ef5" alt="Screenshot 2026 08 29 131415" width="1103" height="520" data-path="images/Screenshot-2026-08-29-131415.png" />
  </Step>

  <Step title="Paste and save">
    Find the closing `</head>` tag and paste your snippet directly above it. Click **Save**.

    <img src="https://mintcdn.com/aibco/bHh4nRd8PVz4miD_/images/Screenshot-2026-08-29-131655.png?fit=max&auto=format&n=bHh4nRd8PVz4miD_&q=85&s=abb6d69b933525cc90216e2b06d635f1" alt="Screenshot 2026 08 29 131655" width="1117" height="520" data-path="images/Screenshot-2026-08-29-131655.png" />
  </Step>
</Steps>

### Wix

<Steps>
  <Step title="Open Custom Code">
    Log into Wix, then go to **Settings → Custom Code** (under Advanced). 

    <img src="https://mintcdn.com/aibco/bHh4nRd8PVz4miD_/images/Screenshot-2026-08-29-131754.png?fit=max&auto=format&n=bHh4nRd8PVz4miD_&q=85&s=68eb34398d2240affad140920aea279f" alt="Screenshot 2026 08 29 131754" width="1163" height="521" data-path="images/Screenshot-2026-08-29-131754.png" />
  </Step>

  <Step title="Add code to Head">
    In the **Head** section, click **Add Code**. Paste your snippet, name it (e.g. *AIBCO Widget*), and select **Load code on all pages**.

    <img src="https://mintcdn.com/aibco/bHh4nRd8PVz4miD_/images/Screenshot-2026-08-29-131842.png?fit=max&auto=format&n=bHh4nRd8PVz4miD_&q=85&s=20a812df0b2b6cf4bf86a7ae6328a941" alt="Screenshot 2026 08 29 131842" width="1163" height="520" data-path="images/Screenshot-2026-08-29-131842.png" />

    <img src="https://mintcdn.com/aibco/bHh4nRd8PVz4miD_/images/image.png?fit=max&auto=format&n=bHh4nRd8PVz4miD_&q=85&s=18c1ddcf80ce256d1ff111ed54ec8f42" alt="Image" width="1918" height="844" data-path="images/image.png" />
  </Step>

  <Step title="Apply">
    Click **Apply**. (Make sure the toggle is enabled)

    <img src="https://mintcdn.com/aibco/bHh4nRd8PVz4miD_/images/Screenshot-2026-08-29-132442.png?fit=max&auto=format&n=bHh4nRd8PVz4miD_&q=85&s=31d2b0bfa58b488f4237056c941034e4" alt="Screenshot 2026 08 29 132442" width="1919" height="860" data-path="images/Screenshot-2026-08-29-132442.png" />
  </Step>
</Steps>

### WordPress

<Tabs>
  <Tab title="Plugin (recommended)">
    <Steps>
      <Step title="Install the plugin">
        In your WordPress dashboard, go to **Plugins → Add New**. Search for **Header Footer Code Manager** (by DraftPress) and install/activate it. 

        <img src="https://mintcdn.com/aibco/bHh4nRd8PVz4miD_/images/0827564a-c156-4a3f-a059-d8a20896f4b9.webp?fit=max&auto=format&n=bHh4nRd8PVz4miD_&q=85&s=e829c31e22e9a69bf7f9d7b049458c86" alt="0827564a C156 4a3f A059 D8a20896f4b9" width="1059" height="528" data-path="images/0827564a-c156-4a3f-a059-d8a20896f4b9.webp" />
      </Step>

      <Step title="Add a new snippet">
        In the sidebar, click **HFCM → Add New Snippet**. 

        <img src="https://mintcdn.com/aibco/bHh4nRd8PVz4miD_/images/22a492d8-3491-4424-b94b-2c0fff2e9914.webp?fit=max&auto=format&n=bHh4nRd8PVz4miD_&q=85&s=b8ccaced0c6131461dc9819e921bfc41" alt="22a492d8 3491 4424 B94b 2c0fff2e9914" width="1101" height="519" data-path="images/22a492d8-3491-4424-b94b-2c0fff2e9914.webp" />
      </Step>

      <Step title="Configure and save">
        Set Name = *AIBCO Widget*, Type = *HTML*, Location = *Header*. Paste your snippet and click **Save**.

        <img src="https://mintcdn.com/aibco/bHh4nRd8PVz4miD_/images/f96283dd-1577-42f3-96e2-4d1ab47c9224-1.webp?fit=max&auto=format&n=bHh4nRd8PVz4miD_&q=85&s=c04ccdd514fcb6273c81478ebb7cf3cc" alt="F96283dd 1577 42f3 96e2 4d1ab47c9224" width="1058" height="521" data-path="images/f96283dd-1577-42f3-96e2-4d1ab47c9224-1.webp" />
      </Step>
    </Steps>
  </Tab>

  <Tab title="Theme file (advanced)">
    <Steps>
      <Step title="Open Theme File Editor">
        Go to **Appearance → Theme File Editor**.

        <img src="https://mintcdn.com/aibco/bHh4nRd8PVz4miD_/images/4bc5b3e7-3b40-49cf-9418-bea699fd8f11.webp?fit=max&auto=format&n=bHh4nRd8PVz4miD_&q=85&s=0bd3ee13650c86ee8b7585acc84d1a3f" alt="4bc5b3e7 3b40 49cf 9418 Bea699fd8f11" width="1150" height="517" data-path="images/4bc5b3e7-3b40-49cf-9418-bea699fd8f11.webp" />
      </Step>

      <Step title="Edit header.php">
        Open `header.php`, find the closing `</head>` tag, and paste your snippet above it.

        <img src="https://mintcdn.com/aibco/bHh4nRd8PVz4miD_/images/5449fcc3-36f3-4560-a3e0-3b63b5456b2e.webp?fit=max&auto=format&n=bHh4nRd8PVz4miD_&q=85&s=a5d1ca994db2d5bf2b5e0d8db6e3990d" alt="5449fcc3 36f3 4560 A3e0 3b63b5456b2e" width="1097" height="523" data-path="images/5449fcc3-36f3-4560-a3e0-3b63b5456b2e.webp" />

        <img src="https://mintcdn.com/aibco/bHh4nRd8PVz4miD_/images/8564e0d0-e603-4a0a-86a8-ec27d4840ecb.webp?fit=max&auto=format&n=bHh4nRd8PVz4miD_&q=85&s=0b47a4681bb5799d013a5c575ec474b6" alt="8564e0d0 E603 4a0a 86a8 Ec27d4840ecb" width="1149" height="519" data-path="images/8564e0d0-e603-4a0a-86a8-ec27d4840ecb.webp" />
      </Step>

      <Step title="Update">
        Click **Update File**.
      </Step>
    </Steps>

    <Warning>
      Editing theme files directly can break your site if done incorrectly. Use the plugin method unless you are comfortable with PHP theme files.
    </Warning>
  </Tab>
</Tabs>

## Verify the installation

Visit your live website on an authorized domain. The launcher should appear in the style and position you configured. If it does not show up, hard-refresh the page and wait up to 60 seconds, then check that the widget is enabled in General settings and your domain is authorized.
